AI老照片修复!1.8万Star的DeOldify,让黑白照片重焕生机
- 2026-05-14 06:20:31
每个人都有一些珍贵的老照片,记录着家庭的历史和长辈的青春年华。但随着时间流逝,这些照片逐渐褪色、模糊、甚至破损。想让它们重焕生机,却苦于没有专业的图像处理技能和工具。
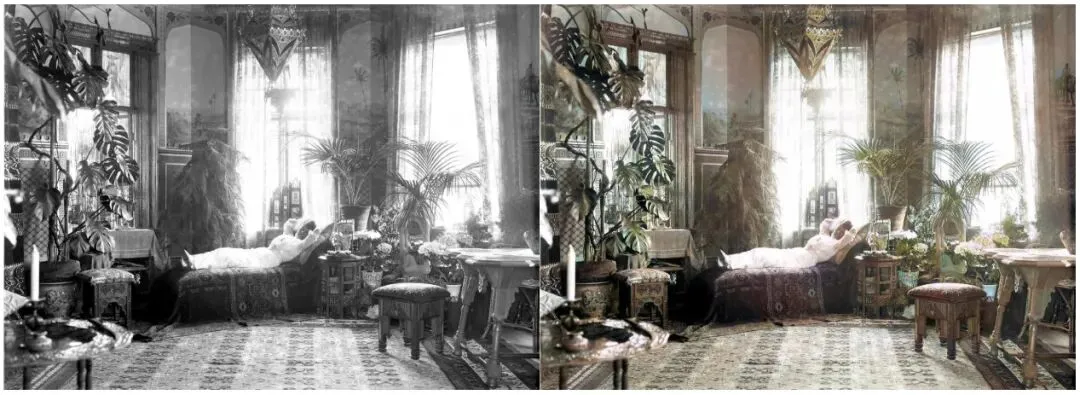
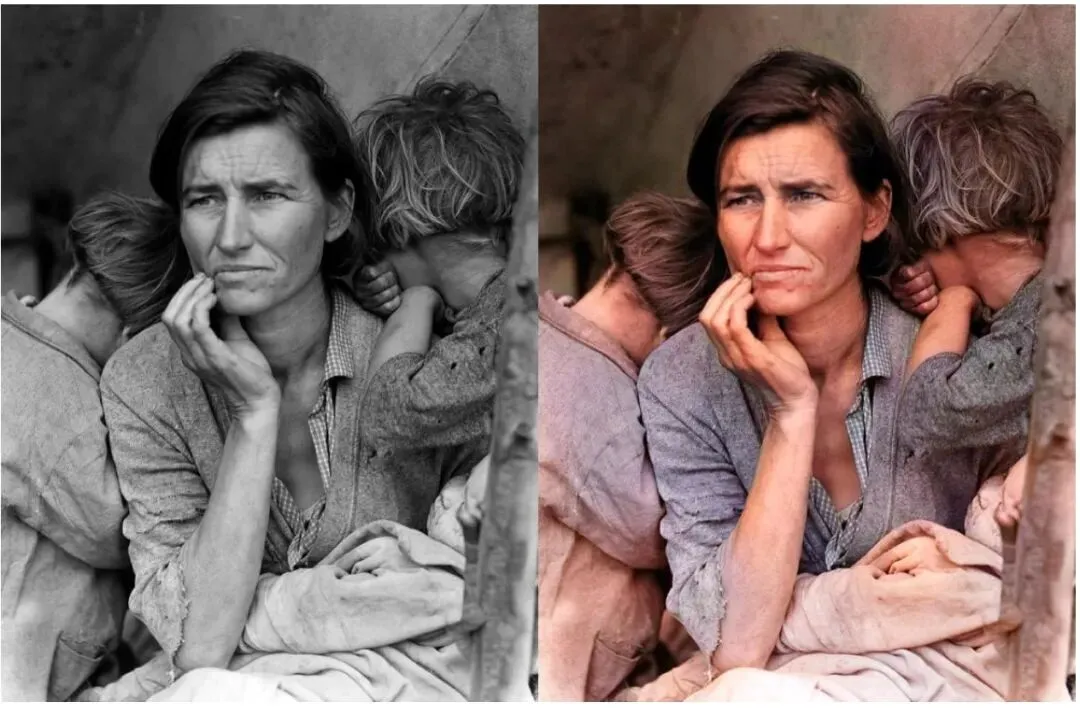
今天介绍的 DeOldify,是一款基于深度学习的老照片修复和上色工具,能自动将黑白照片变成彩色、将模糊照片变得清晰!已获得 1.8万Star,在AI图像处理领域广受好评。
项目简介
DeOldify 是由 Jason Antic 创建的开源项目,使用深度学习技术(基于Self-Attention GAN)对黑白照片和视频进行上色,对老旧、损坏的图像进行修复。它是目前最先进、最受欢迎的开源图像上色方案之一。
DeOldify的训练基于数百万张彩色照片,让AI学会了什么物体应该是什么颜色——蓝天、绿叶、皮肤色调、自然景观——上色效果逼真自然,不会出现"阴天草地是紫色的"这种离谱错误。
核心优势
🎨 智能上色 - 自动识别照片内容,生成自然逼真的色彩 ✨ 细节增强 - 同时修复划痕、噪点、模糊,提升清晰度 🎬 视频上色 - 支持对老电影/视频逐帧上色 🌈 多种模型 - 不同场景有不同优化模型(风景/人像/通用) 💻 本地运行 - 完全免费,无需上传云端,保护隐私 ⚡ GPU加速 - RTX显卡用户可享受实时处理速度
项目地址:https://github.com/jantic/DeOldify
官方文档:https://github.com/jantic/DeOldify#technical-foundations

核心特性
支持的功能
| 图像上色 | ||
| 图像修复 | ||
| 清晰化 | ||
| 视频上色 | ||
| 不同模型 |
技术原理
1. Self-Attention GAN
DeOldify使用了一种叫Self-Attention GAN的生成对抗网络架构。这种架构的特点是能捕捉图像中远距离的依赖关系——比如给一只狗上色时,能同时考虑狗的整体颜色和周围环境的协调性:
普通CNN:局部感受野,只看到一小块区域
Self-Attention:全局感受野,看到整张图的上下文

效果:狗的毛色不会和背景颜色冲突
2. 三种模型对比
| Artistic | ||
| Stable | ||
| Video |
3. 处理效果示意
原图(黑白)→ DeOldify处理 → 彩色照片
    ↓                      ↓
灰度图像          自然上色:蓝天、绿树、人物肤色正确
输出质量对比
快速安装
环境要求
- Python 3.6+
- PyTorch 1.9+
- NVIDIA GPU(推荐,CPU也能运行但很慢)
- 8GB+ RAM
- 10GB+ 磁盘空间
方式一:Docker(推荐,最简单)
# 下载并运行DeOldify Docker镜像
docker run -d \
  --name deoldify \
  --gpus all \
  -p 8080:8080 \
  -v $(pwd)/images:/input \
  -v $(pwd)/output:/output \
  jantic/deoldify:latest

# 访问Web界面
# http://localhost:8080
方式二:手动安装(PyTorch)
# 1. 克隆仓库
git clone https://github.com/jantic/DeOldify.git
cd DeOldify

# 2. 创建conda环境
conda create -n deoldify python=3.9
conda activate deoldify

# 3. 安装PyTorch(CUDA 11.3)
pip install torch==1.9.1+cu113 torchvision==0.10.1+cu113 \
  -f https://download.pytorch.org/whl/torch_stable.html

# 4. 安装DeOldify
pip install deoldify

# 5. 下载预训练模型(自动下载,首次运行会提示)
python -c "import deoldify; deoldify.download_model()"
方式三:Google Colab(免费GPU)
不需要本地安装,使用Google Colab的免费GPU:
# 在Colab中运行
!git clone https://github.com/jantic/DeOldify.git
%cd DeOldify
!pip install fastai deoldify

from deoldify.visualize import *

# 下载模型
colorizer = get_image_colorizer(artistic=True)

# 上色处理
colorizer.plot_transformed_image(
'input.jpg',
    render_factor=35,
    compare=True
)
验证安装
# 运行测试
deoldify --help

# 或者在Python中
python -c "
from deoldify import DeOldify
print('DeOldify installed successfully!')
"
使用体验
图像上色
# 图像上色脚本
from deoldify.visualize import *
from pathlib import Path

# 选择模型(artistic/stable)
colorizer = get_image_colorizer(artistic=True)

# 单张图片上色
colorizer.plot_transformed_image(
    path='photos/grandpa.jpg',
    results_dir=Path('output'),
    render_factor=35,  # 渲染因子,越大色彩越浓(15-40)
    compare=True# 生成对比图
)

# 批量处理文件夹
from deoldify.generators import *

for img_path in Path('photos').glob('*.jpg'):
    print(f"处理: {img_path.name}")
    colorizer.plot_transformed_image(
        path=str(img_path),
        results_dir=Path('output'),
        render_factor=35,
        compare=False
    )
处理流程:
1. 加载图片 grandpa.jpg
2. 检测内容类型(人像/风景)
3. 运行GAN上色模型
4. 输出:output/grandpa.jpg
5. 同时输出对比图:output/grandpa_compare.jpg

原图(黑白)                    DeOldify上色后
┌────────────┐                 ┌────────────┐
│ ░░░░░░░░░░ │                 │ ▓▓▓▓▓▓▓▓▓▓ │
│ ░爷爷的照片░ │   ───────→     │ ▓爷爷的照片▓ │
│ ░░░░░░░░░░ │                 │ ▓▓▓▓▓▓▓▓▓▓ │
│   黑白     │                 │   彩色     │
└────────────┘                 └────────────┘
视频上色
# 视频上色
from deoldify.video import *
from deoldify.generators import *

# 创建视频着色器(使用Video模型)
colorizer = get_video_colorizer()

# 处理视频
colorizer.colorize_from_video_name(
    input_video_path='videos/old_movie.mp4',
    output_video_path='output/colored_movie.mp4',
    render_factor=25,
    transcription=False# 是否保留原音
)
# 命令行方式处理视频
deoldify -s video \
  -i videos/old_movie.mp4 \
  -o output/ \
  --render-factor 25 \
  --video-model
交互式Web界面
# 启动Web界面
deoldify -i

# 或者在Python中
from deoldify.web import app
import uvicorn

uvicorn.run(app, host='0.0.0.0', port=8080)
访问 http://localhost:8080 可以通过拖拽上传图片、调整参数、实时预览上色效果。
常见问题
Q1: 上色效果逼真吗?会不会出现奇怪的色彩?
DeOldify在大多数场景下效果非常逼真。但AI无法知道历史真相(这张照片到底是什么颜色的),所以上色是一种"合理的猜测"。对于有确切历史背景的照片,建议人工微调。对于艺术创作,Artistic模型的夸张色彩反而是优点。
Q2: CPU和GPU速度差距多大?
一张照片:GPU(RTX 3080)约3-5秒,CPU约5-10分钟。一分钟视频:GPU约30分钟,CPU需要数小时。强烈推荐使用GPU。
Q3: 如何提升上色质量?
# render_factor:值越大色彩越浓
# 建议范围:15-40

# 低渲染因子(15):色彩保守,适合写实
colorizer.plot_transformed_image(path, render_factor=15)

# 高渲染因子(40):色彩浓郁,适合艺术感
colorizer.plot_transformed_image(path, render_factor=40)

# 多次处理后取平均(质量更好但慢)
for factor in [25, 30, 35]:
    colorizer.plot_transformed_image(path, render_factor=factor)
Q4: 可以处理中文文件名吗?
支持,但建议使用英文路径以避免编码问题。如果文件名有中文,请确保Python环境使用UTF-8编码。
总结
DeOldify 是开源AI图像处理领域的标杆项目,将复杂的深度学习模型封装成简单易用的工具。它让普通用户也能一键将老照片修复上色,无需专业技能,无需付费订阅。虽然AI无法100%还原历史真实色彩,但它给出的"合理猜测"往往令人惊叹。
🎨 核心优势:一键上色、批量处理、视频支持、本地免费 🛠️ 适合场景:家庭老照片修复、历史影像上色、老电影着色、艺术创作
如果你有珍贵的老照片想要修复上色,DeOldify是免费且效果最好的选择。用AI让尘封的记忆重新绽放色彩吧!
项目地址:https://github.com/jantic/DeOldify
官方文档:https://github.com/jantic/DeOldify#technical-foundations

